Wednesday, March 16, 2011

AOP (Aspect Oriented Programming) and EJB 3: Interceptors

An AOP system allows the separation of crosscutting concerns into their own modules. These modules are then applied across the relevant cross section of application code, such as the beginning of a method call.

EJB 3 supports AOP-like functionality by providing the ability to intercept business methods and lifecycle callbacks. EJB 3 interceptors are object that are automatically triggered when an EJB method is called. They do not provide all the functionality that a full-scale AOP package such as AspectJ offers but are easier to use.
These interceptors are called at the beginning of the bean method and when the method returns and it can inspect the return value or any exception thrown by the method.
Interceptors can be applied both on session beans and message driven beans.
Interceptors could be used for logging purposes or for any other purpose such as transaction or security informations.
In my application I created a logging interceptor that is called every time a user calls the login bean and I print in my business interceptor the username of the user.
This is the method that is called every time a user press the login button and calls the login bean. This method is annotated with the AroundInvoke metadata annotation. We can take the parameters passed to the method called by using the InvocationContext object and his getParameters() method. As you can see I got the Account parameter from the first position of the parameters array because I know that the first parameter that I passed to the authentication method is the Account object. 
After the logging of the user in this method I move on with the real method invocation using the method proceed() from the InvocationContext object.
Beyond these methods, the InvocationContext object has other interesting methods: the getTarget() method retrieves the bean instance of the intercepted method, the getMethod() retrieves the method name intercepted. We just saw the getParameters() method, there is also the setParameters that allows us to modify any parameter passed to the method intercepted. 
The getContextData() method allows us to share data, name-value pairs, between interceptors and retrieve these data in the interceptors chain. 
In the business method interceptor you can throw or handle checked and runtime exceptions. If an exception is thrown before the method is called, then the intercepted method will not be called at all. 

It is also possible to create interceptor lifecycle callback methods that intercept the lifecycle transition of the bean registered for the interceptor. These methods cannot throw checked exceptions and have to invoke the proceed() method of the InvocationContext at the end of the method to proceed the chain of interceptor lifecycle callback methods or the bean lifecycle callback method. In the next picture I show you mi entire Interceptor class: 


To register an interceptor to be called every time a bean's method is called we have to specify it in the bean class:


This is the annotation to be used for an interceptor on level class: it means that for every method called on my LoginBean class my interceptor CheckUserLogin will be called and the method annotated with the AroundInvoke annotation is executed. If we want this interceptor to be called for only one method in our bean we can move this annotation before the method signature. 
There could be three levels of interceptors: default, class level and method level. The default level interceptors will be called first, then the class level and finally the method level interceptors. 
In the @Interceptors annotation there could be a list of different interceptors and these are called in the order they appear on the list.  If we want to exclude a level of interceptors to be called for a given method or a class we could use the annotation @ExcludeDefaultInterceptors for both class and method level or @ExcludeClassInterceptors for the method we want to exclude these.

Monday, March 14, 2011

Sending Email with EJB 3 MDB (Message Driven Bean), JMS (Java Message Service) and JavaMail

In this guide I am going to show you how to send email with EJB 3 Message Driven Beans, Java Message Service and JavaMail.
The JMS API is used to send messages, it is a standard way to access the Message Oriented Middleware in Java.
In JMS the resources are to JDBC DataSource; these are created outside from the code and stored in JNDI. The two administrative object that we need for JMS are the javax.jms.ConnectionFactory and javax.jms.Destination that encapsulates all the configuratio informations needed to connect to MOM. Both are retrieved using the dependency injection with the @Resource annotation.
With EJB 3 retrieving resources is so easy: you don't have to to configure deployment descriptors to create resource references. In the next picture I show you how I inject these two objects:


As you can see from the above image I injected the ConnectionFactory object and created a destination object that means the message will be sent to the queue called ConfirmMailQueue that I created in the container.

To create and send a message with jms we need an object that connects to the MOM and this object is javax.jms.Connection that uses the createConnection() method from the connection factory we just injected. Then we need a Session to be used to send and receive messages; to create a session, a task-oriented context, we use the method createSession() of the connection object. This method takes two parameters: the first is used to specify if the session is transactional or not and the second specifies the acknowledge mode.
The session is not directly used to send and reveive the message; insted a producer is used to do so, and to create the producer we call at the createProducer() method of the session object. Which object is used to send the message? We use our injected destination: the ConfirmMailQueue.
Now we can create and populate the javax.jms.Message to be sent. In my message I send the UserBean that is registering to the application as I can send him the registration confirmation email. To do so I use the method createObjectMessage() from the javax.jms.ObjectMessage object and include my object into the message using the setObject() method. Now I am ready to send the message using the send method from the producer object:


After sending the message we close the resources used during the transaction: the producer and the session.
If everything goes well, our message has been sent to the queue that now we are going to see how it works.

The MDB are a great solution to send messages on J2EE. 
It supports multithreading, it can send messages concurrently without any additional code. This is because the MDB pooling: the instances of MDB are stored inside a pool and when a message arrives to the queue, an instance is retrieved from the pool and used to send the message. 
I am now going to show you how to create a consumer for the message just created with jms; in my MDB I get the email information of the UserBean I included into the message and I send him and email confirmation.


With the @MessageDriven we identify this object as MDB and specify a MDB configuration including the fact that we are listening to the ConfirmMailQueue of the type javax.jms.Queue.
Then we mark our MDB as JMS listener by implementing the MessageListener interface.
The onMessage() method implements the message listener interface and processes the incoming message.
For cleaning purposes we only retrieve the ObjectMessage on the onMessage() method and we do our business on another method passing it the UserBean retrieved from the message.
The business method is the sendMessage() in which I create the connection to the mail server and after the authentication I prepare and send the email. I used a Singleton to prepare and start the connection to the mail server using parameters stored in a property file. Then I passed the session to the MimeMessage and created the message to be sent. In the code you can see that I set the recipient retrieved from the UserBean object, then I also used this object to retrieve his username used in the mail text.
Then I used the transport object to which I set the smtp protocol as connection type and after the authentication I sent the email.
Finally I closed the transport session in the finally clause of my try-catch.

The MDB as the Session Beans has a lifecycle; its lifecycle is equal to the stateless session bean with only two states: the Creation and the Destruction and as it we can use the same callback methods, annotated with the @PostConstruct and @PreDestroy metadata annotations.

Thursday, March 10, 2011

EJB 3 Stateful Session Bean

In this guide I am going to talk about the EJB3 Stateful Session Beans.
In one of my previous posts I talked about Stateless Session Beans; the difference between these two tipes of beans is that the container maintains the state of the Stateful session bean and subsequent method invocations by the same client are handled by the same stateful bean instance.

Bean instances cannot be returned to the pool and reused while a client session is still active. Instead, a bean instance must be held in memory to wait for the next request from the client owning the session. As a result, stateful session bean instances held by a large number of concurrent clients can have a significant memory footprint. The technique called passivation, that I presented in an older post about EJB 3 lifecycle, is used to alleviate this problem.
In the next picture I show you an example of a Stateful Session Bean used to maintain informations of a user during a registration process:


Stateful Session Bean's instance variable used to store the state must be Serializable objects. This is because during the passivation process the bean object must be serialized to maintain his state in memory and to be restored at the next method invocation by the same client. In my bean, the instance variables Account, Contacts and UserBean implements the Serializable interface for this reason. 

Since Stateful Session beans could not be pooled like stateless session beans, there is a danger of accumulating many of them if we don't have a way to destroy them. Therefore, we have to define a business method designed for removing the bean instance by the client using the @Remove annotation. There could be more than one method designated for this reason, in my bean I have only one and it is the register method. The session is terminated and bean instance removed when a client calls this method .


We can also see from the picture the lifecycle callback methods, initialize() and cleanUp(). The first one is called by the container for both the PostConstruct lifecycle and PostActivate, while the second is called by the container before Destroy and before Passivating the bean. The initialize method is used to initialize resources such as connection to the dataSource in my case, while the cleanUp is used to close connections and release resources not serializable, in my case to close the connection to the dataSource.

Business interface for Stateful Session beans works at almost the same way as it does for stateless session beans, with some exceptions. Stateful Session Beans support only @Local and @Remote invocations and could not be called and exposed as web service because of the stateless nature of SOAP web services. It could be possible to annotate business interface methods with the @Remove annotation.


As you can see from the previous picture I used to expose a @Remote business interface with the methods to call the Stateful bean. It is a simple POJI (Plain Old Java Interface).

Now we could give a look at the client that calls the Stateful Session Bean.
Almost any Java component could be a Stateful bean client: jsp pages, servlet, pojo or other beans, but NOT stateless session beans. 
Stateful session bean clients follows these general steps to use a stateful bean: 
  • the client receives a reference to use to the bean from JNDI;
  • all the invocations to the bean are made through the appropriate interface, in my case the remote interface I presented before;
  • the client makes as many calls to the bean methods as required to complete the session;
  • the last method invocation is the method annotated with the remove metadata annotation that removes the instance and distruct it.

I used a servlet as client for my stateful session bean, and because the servlet may be shared by multiple clients and the instance that we inject to a servlet instance could be used by more than one client at the same time. 
Because of this fact I retrieve a bean instance using the JNDI lookup from the initial context instead of using the @EJB annotation as I used for the Stateless Session Bean. 
The previous picture shows the servlet I used to call the setAccount() method from the business interface, and other servlet similar to this one are used to call the other business methods. 
To handle the instance of the bean I used to put the bean instance to the HttpSession of the client. I don't know if it is the best way to hold the bean instance. I searched for other ways to do so and I have not found so many other ways. Someone used to Serialize the bean instance in a file using a BufferOutputStream but, I repeat, I don't know which is the best way. 
In EJB 2 we used the Handle interface to Serialize the EJBObject but in this version of the EJBs there is not an interface that extends the EJBObject so I don't know how to do this in the same way.
Thats all for now. We'll see other components in the next posts.

Monday, March 7, 2011

EJB 3 Lifecycle Callback Methods

Session beans have a lifecycle. This means that beans go through a predefined set of state transitions.
The container manages almost every aspect of session beans, from the creation, through to the injection of resources as you saw on my last post with the @Resource annotation, to the distruction of the bean.
Managing those actions allows the container to provide the abstractions that are some of the real value of using EJBs, like DI, transaction management, AOP, security, etc.
The lifecycle of a session bean has at least 2 events: the creation and the destruction. Stateful session beans have other 2 phases: activation and passivation.
The first phase of a bean lifecycle is the bean creation; it happens when a client receives an instance of a bean. During this phase a new instance of a bean is created an, it is initialized by calling its constructor and, if any resource is required, those will be injected in the newly created instance.
The last phase of a bean lifecycle is the bean destruction: it occurs when the container determines that the instance is no longer needed and all the resources previously injected in the bean will be released.

Lifecycle callbacks are bean methods, not exposed by the business interface, that the container uses to notify the bean about a lifecycle transition or an event. These methods could be used to perform business logic or to initialize or cleanup the injected resources.

 The callback methods common to all session beans are annotated with metadata annotations @PostConstruct and @PreDestroy.
The method annotated with the @PostConstruct annotation will be called by the container just after the creation of the bean, while the callback method annotated with the @PreDestroy annotation will be called by the container just before the destruction of the bean.
In the following picture you can see an example of these 2 methods in which I initialized and cleanup the resources I used on my LoginBean: the connection to the dataSource.


As you can see, the bean on the previous picture is a stateless session bean so I only have the callback methods inherent to the construction and the destruction of the bean, annotated as @PostConstruct and @PreDestroy. The only think I did in these methods is open the connection to the dataSource in the initialize method, and close the same connection to the dataSource in the cleanUp method that is called before the bean destruction by the container.

The stateful session bean, could have other two callback methods because of the other other two phases of its lifecycle. As you know the stateful session bean can maintain state to serve the same client during his session. If the client is inactive for a while, the stateful session bean is passivated, and when the client is back active the bean is re-activated. During these phases the container could call the other two callback methods to manage the resources of the bean or doing any other business logic. The methods associated with these two phases are annotated with the metadata annotations @PostActivate that will be called after the activation of the bean, and the @PrePassivate metadata annotation.


In the previous picture I have a stateful session bean. I used the same method for the @PostConstruct and @PostActivate lifecycle phase because I do need the same resources in both the phases: I open the connection to the dataSource. I also have only one method for @PreDestroy and @PrePassivate phases and in this method I close the connection to the dataSource.
If I want to do any other thing before or after one of the lifecycle phases I could create another method just for that phase.
Thats all for the callback methods, in the next method I will talk about the stateful session beans.

Sunday, March 6, 2011

EJB 3 Stateless Session Bean

In this guide I am going to show you how to create an Ejb 3 steteless session bean.
Stateless session beans are used to implements process that could be done in one action, such as a login.
EJB 3 beans look like POJO classes; you do only have to implement the business interface that could be Local or Remote, or both.


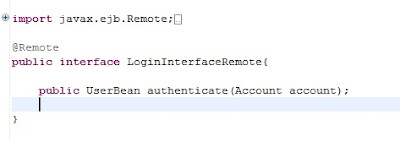
From the picture you can see that I created a Remote Interface for my bean by annotating it with the @Remote annotation. It means that the bean could be accessed remotely using this interface. The remote call is provided by the RMI (Remote Method Invocation) call.
Stateless session beans, due to their nature to don't maintain state, could also be exposes as Web Services, because web services as them should not maintain any state, using to annotate the interface with the @Web Service annotation providing the remote call by the Simple Object Access Protocol.
In the next picture I show a simple Stateless session bean:


The only thing we have to do to denote this class as a stateless session bean is annotate it as @Stateless, as I you can see over the class declaration, and implement the business interface we crated. Doing so, the container automatically provides its services to the bean.
The @Stateless annotation has different attributes such as name, mappedName, etc that could be used to set his JNDI name. If omitted, as in my case, his JNDI name is by default the class name.

Another important annotation that we can recognize into the code is the @Resource annotation. It allows us to inject into the bean external resources such as datasources, as I did in my code. The name parameter of the resource annotation, denotes the ENV name of the component, while the mappedName parameter denotes the Global name of the component, that is the JNDI name used inside the container in which this resource has been deployed.

Let's see now how the client calls and uses the bean I have just created:


I created only a Servlet on which I Injected the bean using his remote business interface.
The only thing to do to use a bean from a servlet or another client is to inject it using the @EJB annotation and then use the business methods provided by it.

In the next guides I will show you other important components and annotations of EJB 3.

Tuesday, March 1, 2011

Struts 2 Interceptors

In this guide I am going to show you how the struts 2 interceptors work.
Interceptors are new in Struts 2, those are classes that does not maintain a state and are automatically called before and after an action invocation.

Struts 2 has a number of interceptor that are called default on every action call, mapped in a stack, called defaultStack. The main default interceptors are the following:

  • Exception: allows to map a particular exception on a view;
  • Prepare: allows to call a method to initialize an Action if it implements a determined interface;
  • I18n: manage the locale for the current user;
  • Debugging: allows to activate the views debug;
  • FileUpload: allows to manage the file upload;
  • Validation: allows to validate the form fields, based on the xml validation files.
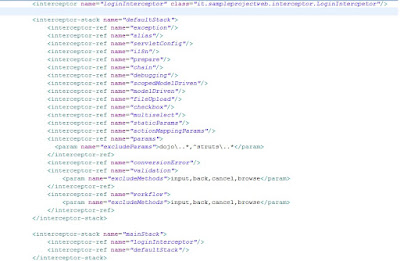
In the next picture I show you the default stack of interceptors:


If we implement a new custom interceptor for our application to be called before every action call as the default interceptors, we could create a new stack for it or put it in the default stack.
If we put it in the default stack, we need to list all the other interceptors defined default by struts, else it will not call those anymore. 
In the next picture I show you how I defined my interceptor in my struts.xml: 


As you can see from the picture above, I defined my new interceptor called loginInterceptor, then I listed the defaultStack with only the interceptors defined by struts 2.
Next, I created a new stack called mainStack on which I put my brand new interceptor and the default stack. 
After that I defined which one is the default stack that struts has to call: 
Here we tell Struts the default stack to call is the mainStack defined by me, in which there is my loginInterceptors and all the default interceptors referenced by the defaultStack.

Now I show you how to create an interceptor.
An interceptor class must extend the AbstractInterceptor abstract class of which we must implement the method  public String intercept(ActionInvocation invocation) throws Exception.
This method, as all the methods of struts actions, returns a String that in this case is the action that we are calling or, if any error occurs, any action defined by us to handle the error occurred.

My example of interceptor controls if the user that is using the application is logged in, looking for the session parameter userName. If the userName parameters is not null and not empty, it returns the action called by the user. If the user is not in session, but it is calling the loginAction to log in, then we return the action called by the user to allow him to log in. If the user is not in session, and the action called by the user is not the LoginAction, then we return a expiredSession result that sends the user back to the login page:


From the imageshowed above you can see that the ActionInvocation object has a lot of useful methods:
  • invocation.getAction().getClass().getName(): Those three methods allows us to retrieve the name of the action class called by the user;
  • invocation.invoke(): This method calls the action method to execute after the interceptor if everything works well inside it. 
You can see in the image the behavior of the interceptor that I expained before it.